Category: Tools

Pincushions

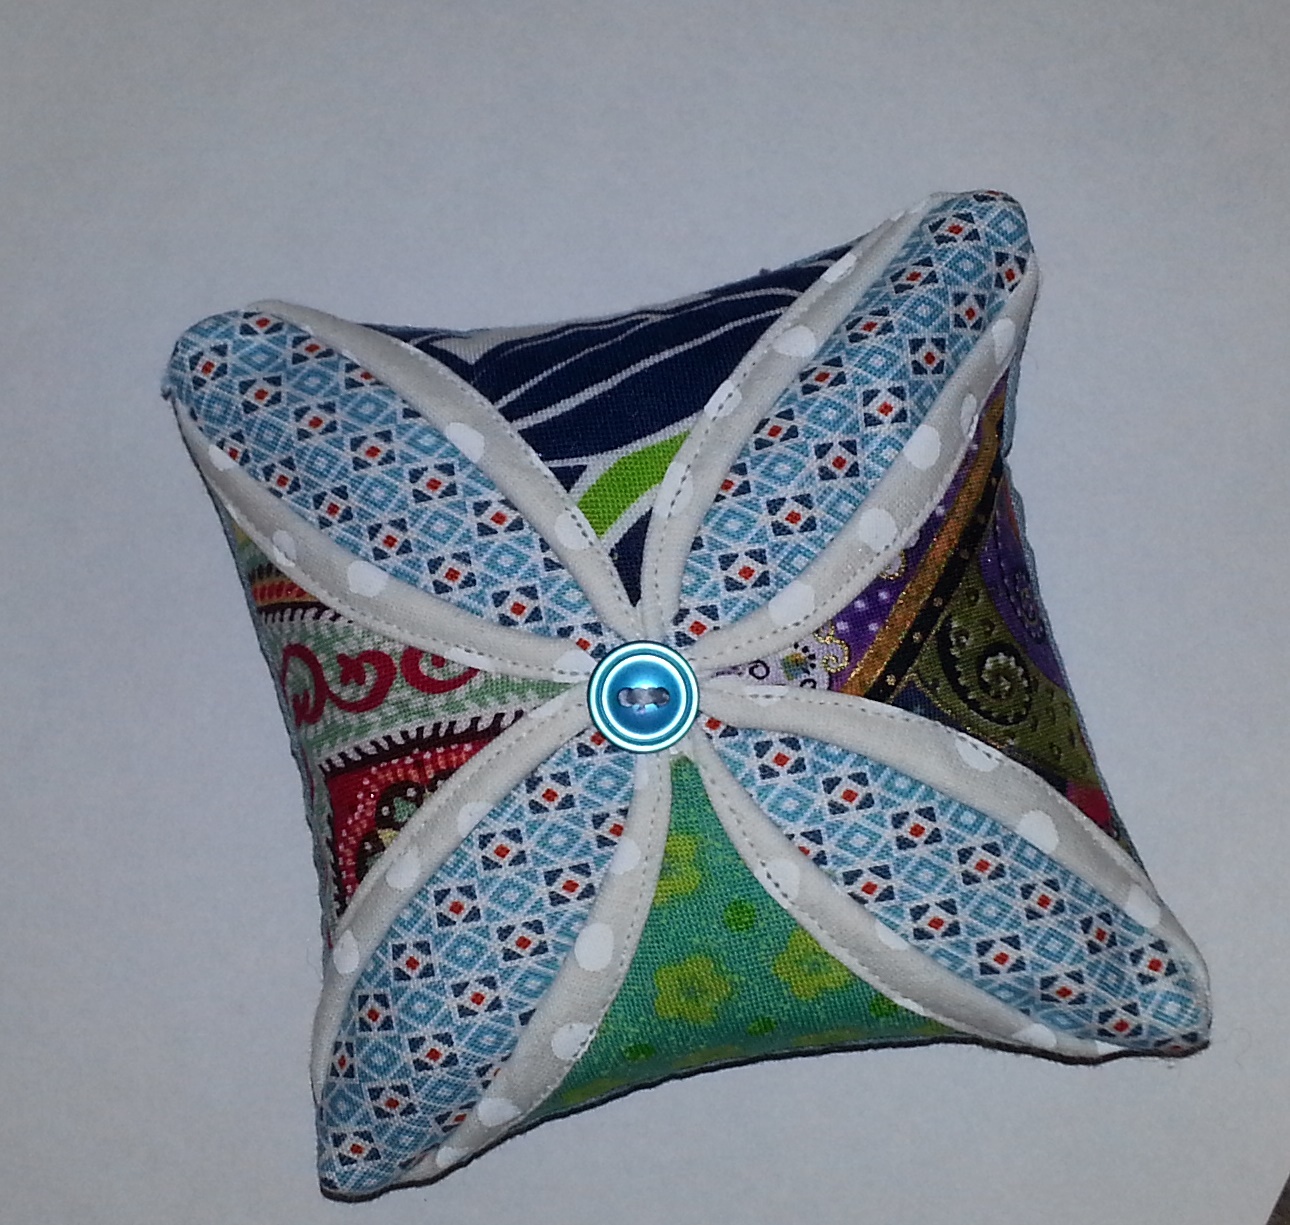
Pincushions are a new interest of mine.  They are small, can be interesting, fun to make and usually not too involved so they can be finished quickly.  I decided to do a Cathedral Window pincushion and see how that works.  My mother in law made sever cathedral window quilts for us and I have always loved them but  really didn’t have the patience or interest to do an entire quilt.  I do remember tracing and cutting out white squares and patterned squares for her however.  She used scraps from many of the clothes I made for my girls when they were little.

For this pincushion, I used some scraps and did a quick job and think I’ll make some more.  It’s not my finest sewing job but I had fun.

Cathedarl Windwow pin chushion April 2014

New ironing table

I have a new ironing table.  Make that I’ve created a new ironing table.  It works very well and I’m pleased.  My sewing space is very small and compact and my big ironing board will not also fit in the space where I sew. I usually have it set up in my office in the room down the hall. For many things that’s just fine but when I’m in a hurry I just don’t like to get up and walk down the hall. I have used a small ironing board that sits between my sewing machine and my serger. This is ok for small pieces but hard even for longer or larger pieces.

As I’ve read blogs I’ve seen many folks using old wooden tv tables and transforming them into portable ironing tables.  They have just purchased these at the local Goodwill store.  We have a new Goodwill in my neighborhood and that was my plan.  Soon however the lightbulb went off!  I had several small plastic folding tables that I had used in my office to hold scanning equipment.  These are adjustable height and have been very useful.  My office needs have changed however and I had a table I wasn’t using so I decided that I could transform this table to an ironing table.

I started with the table and covered it with quilted ironing board fabric I taped it down on the sides with duct tape.

ironing table in progress


The next layer was a piece of colorful fabric.  I’m very pleased.  It works well and is the perfect size.

new ironing table


Red, white and blue.

Red white and blue is the theme for today.  Yes, even here in Edmonds it’s a holiday.  Our little town has a children’s parade, a regular parade, a holiday run, activities in the park and even fireworks.  It’s been fun to drive around town the day before these activities and see the people preparing for this big day. This photo was taken yesterday morning.By 10 pm last night the chairs were elbow to elbow.  Too bad it was too dark to take a picture because it certainly made me chuckle.

chairs on the street_e


It has been a quiet day here at our house. I finished the binding on the red, white and blue table runner.  It was cut from a remnant that I found at JoAnn’s last summer.  It was nice to have it in my stash so when the motivation struck, I was able to pull the fabric, use the AccuQuilt Go cutter and get to work.

We did have some folks stop in the afternoon. Soon we’ll have some barbecued hamburgers and beans. A traditional kind of 4th meal.  The sun is out and I may go and finish the baby quilt that is sitting waiting for some batting and quilting.  That needs to be finished by next Friday so I’ll have to get in gear. Second choice is to sit in the sun and read.  Hope you are having a wonderful day too.

red white and blue table runner


Rag blanket finish

A rag blanket finish happened this week.  It actually was fun to do and I’m pleased with the finished product.  When I first bought this die I thought this would be a great way to use the flannel remnants.  As it turns out, because you use two pieces of fabric in each block the remnants don’t go very far. I knew that I was making this blanket for a little boy and have since learned that the mom is already in the hospital waiting for this little one to appear.  It’s a bit early for his arrival however so they hope he will take his time! In the end, I was able to mostly use fabrics from my stash.  I did end up buying a small piece of yellow.  Hubby was a bit reserved about the project but was also impressed after it had been washed and dried.  Like he said, it almost makes a chenille type fabric after it’s been in the wash and I’m sure it will get softer with each wash.  I think I’m off to make another.

rag blocks

rag quilt before

Remember the old hangers?

Remember the old hangers that used to be in everyone’s closet? You know the kind I mean.  The wire ones your mom got from the cleaners. Sometimes they were colored and I loved those.  I remember one turquoise one that I used to have.  Sometimes they were white but mostly they were gold or gray or just metal colored.  The other hangers that were special were the ones with the cardboard tube at the bottom that you could use for slacks.  We didn’t have too many of those and they were used only for the best pieces that you didn’t want creases in.  Well in my latest sewing project I kept wishing that I had a slacks hanger.  The kind I was thinking about was a wooden one that hubby had when we were first married.  I think they were from his wedding suit and it not only was sturdy wood but had a moveable bar on the bottom that you could unhook to slide the slacks on and then hook it back together and put it in the closet.  We have moved to mostly wash and wear and plastic hangers and I haven’t thought much about hangers until recently when I wanted to hang the latest sewing project.  The project was circles of fabric that I wanted to slide over something and hang.  I couldn’t justify taking the old wooden hanger that now holds other slacks of hubby but lo and behold when I opened the coat closet door, I found a secret stash in the far back.  There it was, the perfect hanger! It is wire with a sturdy cardboard tube.  Happy day!  Now my circles are hung waiting for delivery and I am remembering more good times and special hangers.

.

A new sewing tool.

It’s always exciting to find a new sewing  tool. One of my recent discoveries is a new marking pen.  When I’m sewing projects there are always things to mark.  Sometimes it’s a cutting line.  Sometimes it’s a place to join another piece of fabric.  There are times that it’s necessary to mark the front or the back.  There are various ways to mark any of these things.  Sometimes it’s appropriate to make a notch in the fabric.  There are times I’ve used tailor tacks.  You can use marking chalk’s or marking pens.  There are several different types of marking pens including water-soluble or air soluble.  I’ve also used  marking wheels and tracing paper.  Another method of marking is actually stitching him a line without any thread.  This can be handy as a guide to turn a hem.  You can also use an iron to make a press mark or simply finger press a fold. 

The current new sewing tool that I’m using for marking are pens made by Pilot. These Frixion Gel Pens are like magic.  You can mark with them on fabric and then simply press with a hot iron and the marks go away.  They are so fast and easy to use and the different colors make them easy to use on fabric.  It’s too bad my children are all grown up.  I’m sure they would’ve loved to use these pens to write secret messages.  I can imagine all the fun, they would’ve had when playing with their friends.  Hmm…  maybe this should be a little something extra they get for a birthday or Christmas


© 2024 Starfish Alley

Theme by Anders NorenUp ↑